Jumat, 04 Maret 2016

Unknown

Solusi Interface Ethernet Status Selalu "R" Running

Kenapa Interface Ethernet Mikrotik status nya selalu "R" Running, padahal tidak ada kabel yang nyolok ke port Ethernet nya? Pertanyaan ini juga ada di benak saya ketika Saya meng-Install Mikrotik x86 pada PC. Sebagai catatan Mikrotik RouterOS x86 adalah versi RouterOS yang khusus di desain untuk PC/Server dengan arsitektur x86 (32 bit). Usai proses instalasi Mikrotik x86 di PC, saya coba cek apakah interface ether nya terbaca atau tidak, mengingat saya pasang juga 2 x 4 port RB44GE. 


Sedikit terkejut ketika melihat status Interface Ethernet Mikrotik nya "R" semua yang mengindikasikan kalau port ethernet nya ada kabel yang nyolok. Padahal PC belum konek ke mana-mana. Jika dilihat pada status detail pada interface nya pun keterangan Rate nya unknown, walaupun state nya Running tapi indikasi no link.


Begini jawabannya :

Secara default, Mikrotik x86 menempatkan konfigurasi pada Ether untuk command disable-running-check pada posisi yes. Hal ini menyebabkan Semua Ether dalam status 'R'. Kenapa? Berikut penjelasan dari wiki.mikrotik.com.
Disable running check. If this value is set to 'no', the router automatically detects whether the NIC is connected with a device in the network or not. Default value is 'yes' because older NICs do not support it. (only applicable to x86)
Pada intinya, command disable-running-check=yes ini sengaja dibuat default, karena tidak semua NIC (Network Interface Card) bisa mendeteksi apakah port ether nya konek ke perangkat lain apa tidak, terutama pada NIC jadul. Namun, untuk perangkat jaman sekarang sepertinya sudah tidak memerlukan hal tersebut.

Nah, udah jelas kan jawabannya?
Sekarang lanjut ke cara mengatasi Interface Ethernet Status Selalu "R" Running.
1. Masuk ke Terminal Mikrotik
2. Ganti command disable-running-check=yes ke no. Berikut command nya :
interface ethernet set disable-running-check=no numbers=0
itu command untuk ether 1, untuk ether lainnya ganti numbers nya. Jika ether nya banyak, bisa gunakan koma.

Contoh nya untuk ether 1 - ether 10 berikut command nya :
interface ethernet set disable-running-check=no numbers=0,1,2,3,4,5,6,7,8,9

Hasilnya seperti yang ditunjukkan gambar di atas.
Oke terjawab sudah pertanyaan Kenapa Interface Ethernet Mikrotik status nya selalu "R" Running, padahal tidak ada kabel yang nyolok ke port Ethernet nya? beserta Solusi Interface Ethernet Status Selalu "R" Running.
Semoga bermanfaat :)
Read More

Jumat, 26 Februari 2016

Unknown

Clashbot v7.10.4 REV 1843 Cracked Version

Assalamu'alaikum Wr. Wb

AD-ITech - Hello guys, I back with clashbot, before my post was deleted. I'll bring back here..
This is a latest version of clashbot. Enjoy!

Clash of clans is a freemium strategy video game on mobile devices developed by Supercell, a video game company based in Helsinki, Finland. 
The game was released for the iOS platform on August 2, 2012. [1] For Android, the initial launch is done in Canada and Finland on 30 September 2013. On October 7, 2013, the game was released internationally on Google Play. 

Clashbot, bot for clash of clans


Release 7.8.2 Contains:
  • Fixed bot attacking incorrectly
  • Fixed auto-wall upgrading amount
Release 7.8.1 Contains: 
NEW FEATURES
  • Added Hours of operation to Misc Tab
  • Added Return home every x bases to Misc Tab
  • Added Preferred resolution for when you exit the bot to Misc tab
  • Added option to keep x builders free to Buildings/Upgrades tab
  • Custom check for clan donation request timeout on Clan tab
BUG FIXES/IMPROVEMENTS
  • Better TH7 and TH8 town hall detection
  • Bot ends battle faster after earning a star when Trophy Pushing
  • Trophy Push mode now only displays relevant information (not resources) in log
  • Troop training button is only held in until barracks is full
  • Added definitions for Hidden Tesla
  • Improved wall definitions
  • Remove debug view of upgrade button
  • Double check wall level/price before performing upgrade (thanks to TheM3ch@nic)
  • Bot only waits 5 seconds for match now
  • Reading number improvements (should help building upgrades)
  • Improved town hall definitions (less false positives, better left/right performance)
  • When trophy push is active, heroes are always activated just before ending battle to regain health
  • Donation improved so bot doesn't miss donate buttons
  • Do not check for defense levels if base doesn't meet loot requirements
  • Version number system changed; should now display correctly in title bar and log
  • Fixed exception during barracks training phase
  • Fixed clicking on certain wall pieces
  • Fixed bug where game would get itself stuck in Matchmaking (thanks dirtydog)
  • Fixed minor bug that could cause bot to get hung up at Matchmaking screen
  • Fixed potential bug when zooming out
  • Fixed infinite tries on donate button when conditions aren't met (thanks to Itz_FrOs)
  • Fixed game hook timing issue
  • Fixed detection of 'Please rate our app'
  • Fixed detection of dark barracks
  • Fixed town hall detection on the left and right side of the screen
  • Fixed bug where Hours of Operation would stop bot even when it wasn't checked
  • Training units should never spend gems now
BETA Release 7.9 BETA 2 Contains:
  • Fixed Log-In Errors!
  • Dead Base Detection is Accurate!
  • Zooming Out and Scrolling is Fixed!
  • Spell and Troop donation works!
  • Spell Training Added!
Known Bugs [READ]

  • Custom troops is not working
  • End battle if no resource change and star does not work
  • Tries to deploy inside red line sometimes
Release 7.9.2 Contains:
  • Custom Troops!
  • One sided deployment
  • Upgrades to Air-Attacks for One-Side Deploy
  • Optional snow update support!
  • New Personal Break Handling!
  • Slightly Dead Bases Works!


System Requirements
  • You must be an Administrator on your PC.
  • Your PC must have 2GB of RAM/main memory.
  • Your PC must have 4GB  of disk space available for storing Android apps / games and their data.
  • The drivers for your PC’s graphics drivers should be updated for compatibility with BlueStacks
Installation Tutorial
  1. Install BlueStacks [Download Here]
  2. Install Clash of Clans on BlueStacks
  3. Login to your Clash of Clans's account
  4. Install .NET 4.5.1 [Download Here]
  5. Change your monitor display setting to 800x600
  6. Download clashbot
  7. Configure Clashbot [Need Account, register at http://boostbot.org]
Clashbot v7.9.0.1645
v7.9.0
Clashbot v7.9.0_1665


Download Link
Version 7.6 BETA [KumpulBagi
Version 7.7 [KumpulBagi]
Version 7.7 Update 1 [KumpulBagi]
Version 7.7 Update 2 [KumpulBagi]
Version 7.7.4 [KumpulBagi]
Version 7.8.1 [KumpulBagi - Mirror]
Version 7.8.2 [KumpulBagi - Mirror]
Version 7.9.0.1645 [Mirror]
Version 7.9 BETA 2 [MEGA - Mirror]
Version 7.9.0_1665 [KumpulBagi - Mirror]
Version 7.9.2_1716 [Mirror - Solidfiles]
Version 7.10.3 Cracked[Mega - Mirror]
Version 7.10.4 Cracked [Mirror
Version 7.10.4 Cracked [Mirror]


That's all from me, thanks for visiting and keep support us. 
Wait the next update.


Thanks to Boostbot
                 Nulled.IO

Wassalamu'alaikum Wr. Wb


Read More

Rabu, 17 Februari 2016

Unknown

Mengenal Mikrotik Cloud Router Switch (CRS)

Cloud Router Switch (CRS) adalah perangkat Smart Switch Series berperforma tinggi besutan Mikrotik yang memiliki banyak port ethernet (hingga 24 port). Perangkat CRS ini merupakan Multilayer Switch, yaitu selain bekerja pada layer 2, juga bisa bekerja di layer 3 switch dan uniknya OS yang digunakan juga RouterOS sehingga semua fitur pada RouterOS juga bisa diterapkan di perangkat ini. 

Contoh Mikrotik Cloud Router Switch (CRS)


Fitur Utama Cloud Router Switch

1. Forwarding
Port pada CRS dapat dikonfigurasi untuk switching maupun routing yang mendukung Full non-blocking wirespeed switching. Semua forwaerding database mendukung IVL dan SVL. Port based MAC learning limit yang dapat dikonfigurasi maksimal 1024 MAC per port. Selain itu, CRS juga mendukung frame dengan ukuran jumbo (CRS1xx: 4064 Bytes; CRS2xx: 9204 Bytes).

2. Mirroring
CRS mendukung bermacam tipe port mirroring, seperti : Port Based Mirroring, VLAN Based Mirroring, dan MAC Bassed Mirroring. Selain itu CRS juga memiliki 2 independent mirroring analyzer port.

3. Virtual LAN (VLAN)
Mikrotik CRS kompetibel dengan strandar IEEE802.1Q dan IEEE802.1ad VLAN. CRS mampu membuat active VLAN hingga 4000 VLAN. Mendukung Port Based VLAN, Protocol Based VLAN, MAC Based VLAN dan VLAN filtering.

4. Port Isolation & Leakage
CRS dapat diaplikasikan untuk mengimplementasikan private VLAN dengan 3 tipe port profile : Promiscuous, Isolated dan Community. Mendukung hingga 28 Comunity Profile.

5. Trunking 
CRS mendukung trunking dengan static link aggregation groups. Dapat membuat hingga 8 port Trunk group dan 8 port per trunk group. Mendukung Hardware automatic failover dan load balancing.

6. Quality of Service (QoS)
Mikrotik CRS juga mendukung manajemen bandwidth dengan penerapan QoS berdasarkan port, MAC, VLAN, Protocol, PCP/DEI, DSCP, ACL.

7. Shaping & Schedulling\
Mendukung 8 queue pada tiap port fisik, Shaping per port, per queue, dan per queue group.

8. Access Control List (ACL)
CRS mendukung Ingress dan Egress ACL table, dan hingga 512 ACL rule. Klasifikasi berdasarkan port, L2, L3, L4 protocol header. ACL actions meliputi filtering, forwarding dan dapat melakukan modifikasi pada protocol header fields.

Model Cloud Router Switch (CRS)

Berikut ini beberapa perbedaan pada model Mikrotik Cloud Router Switch (CRS) : 
Model CPU Wireless SFP+ port Access Control List Jumbo Frame (Bytes)
CRS112-8G-4S 400MHz - - + 9204
CRS210-8G-2S+ 400MHz - + + 9204
CRS212-1G-10S-1S+ 400MHz - + + 9204
CRS226-24G-2S+ 400MHz - + + 9204
CRS125-24G-1S 600MHz - - - 4064
CRS125-24G-1S-2HnD 600MHz + - - 4064
CRS109-8G-1S-2HnD 600MHz + - - 4064


Tagged Untagged
Di CRS, fitur tagged dan untagged bisa dibuat berdasarkan port, protocol ataupun berdasarkan mac address, agar memudahkan dalam melakukan custom di jaringan kita.
Untuk contoh topologi yang akan kita bentuk seperti berikut :
Topologi Contoh

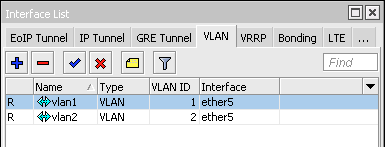
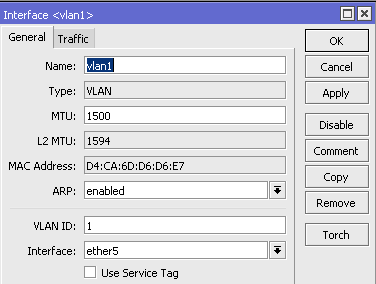
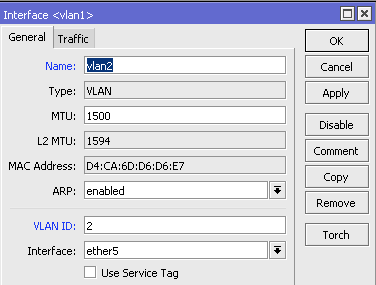
RB450G, di interface ether5 terdapat 2 vlan, yaitu vlan-id=1 dan vlan-id=2
Kabel ethernet dari ether5 450G terhubung ke ether10 switch CRS
PC client yang akan kita masukkan kedalam vlan, terhubung ke ether12 dan ether14 dari CRS

Konfigurasi di sisi RB450G


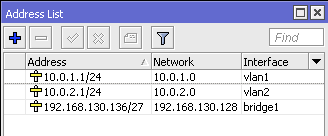
Disini kita mendifiniskan vlan-id=1 dan vlan-id=2 di interface ether5. Dan tentunya kita juga pasangkan IP di masing-masing interface vlan tersebut.

Konfigurasi di CRS
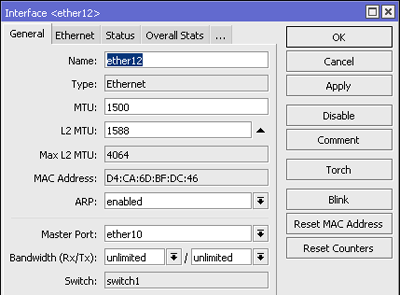
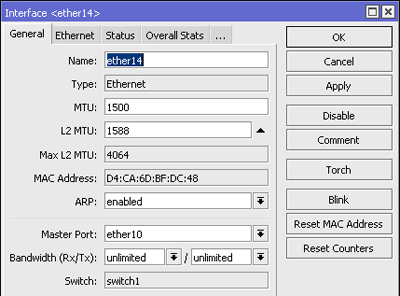
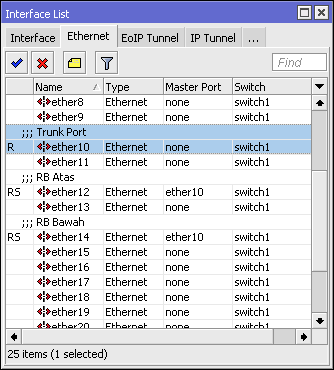
Agar dapat memfungsikan fitur-fitur switch pada CRS kita, langkah pertama yang harus dilakukan adalah mengeset parameter "master-port" di interface ethernet yang ingin kita aktifkan sebagai switch. Fungsi dari master-port ini sebagai interface penghubung antara ethernet-ethernet yang menggunakan mode switch (SLAVE-PORT) dengan interface ethernet lain yang non switch mode. 


Dari gambar terlihat, ether12 dan ether14 kita atur sebagai slave dengan master-portnya di ether10. Artinya, ether10, ether12 dan ether14 sudah menjadi sebuah switch dan komunikasi antara port tersebut bisa full wire speed tanpa membebani CPU router lagi.
Apabila kita ingin memfungsikan routing, firewall, bandwidth management, qos dan sebagainya, kita cukup memasang rule-rulenya di ether10. Kenapa? karena ether10 berfungsi sebagai master-portnya, otomatis, setiap rule di ether10, akan berlaku di semua slave portnya (ether12 dan ether14)

VLAN berdasarkan Port
Dicontoh ini kita akan memfungsikan switch kita sebagai switch managed l2 berdasarkan PORT INTERFACE.
Karena ether10 terhubung ke interface RB450G yang memiliki vlan-id, berarti kita ingin semua trafik yang keluar dari ether10 harus sudah memiliki vlan-id (tagged / trunk port), begitu juga sebaliknya, karena perangkat yang terhubung di ether12 dan ether14 merupakan perangkat PC biasa, berarti kita harus mengatur semua trafik yang keluar dari kedua port tersebut harus dihilangkan dahulu vlan-idnya (untagged / access port).

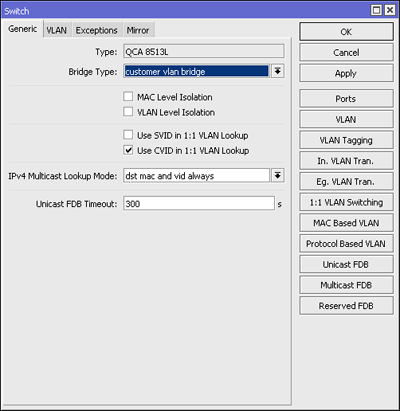
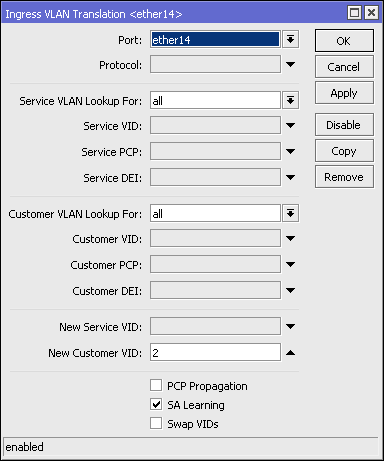
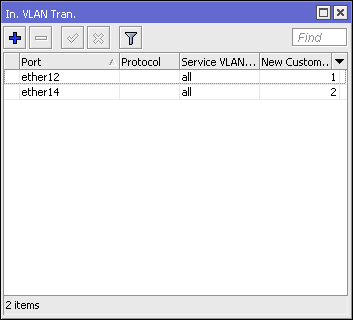
Ingress VLAN Translation
Di menu ini, kita bisa memodifikasi frame yang masuk/incomming/ingress dari port switch kita.

Dari gambar terlihat, semua trafik yang berasal dari ether12 dan ether14 diset new-customer-vid sesuai dengan VLAN-ID pada RB450G, artinya frame yang semula memiliki customer-vid=0 (tanpa vlan-id), begitu masuk dari ether12 dan akan ke ethernet manapun akan diset memiliki new-customer-vid=1 (vlan-id=1 / tagged)

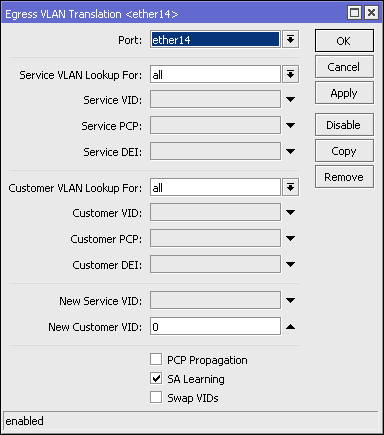
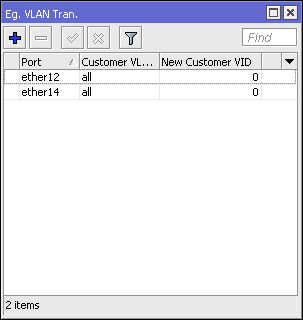
Egress VLAN Translation
Di menu ini, kita bisa memodifikasi frame yang akan keluar / outgoing / egress dari port switch kita.

Dari gambar terlihat, semua trafik yang akan keluar dari ether12 dan ether14 diset new-customer-vid menjadi 0 (tanpa vlan-id), sehingga trafik yang keluar dari ether12 dan ether14 bisa diterima PC biasa. Hal ini sama dengan membuat ether12 dan ether14 menjadi access port / untagged.

Hasil Akhir Dengan memfungsikan konfigurasi diatas, PC client yang berada di vlan1 dan vlan2 komunikasinya tidak lagi via layer 2 meskipun berada dalam 1 switch fisik, tetapi harus komunikasi inter-vlan yaitu melalui RB450G. 

Sumber :
http://mikrotik.co.id/artikel_lihat.php?id=73
Read More

Kamis, 11 Februari 2016

Unknown

How To Flash Hitech Amaze Tab 3 Via SPFT


Tutorial Flashing Stock Rom Hitech Amaze Tab 3 using SP Flashtool cause damage to software, application error, the touch screen does not work, the initial loading is not completed or bootloop and errors due to root damage and various kinds of softwareIt can be fixed by updating the firmware or flash reset, the total space is full. Ram's performance resulted in slowing down and making Android damaged software or in many cases the initial loading can not get into the main menu. but do not worry there are plenty of cases of damage to software that can be resolved by Flashing repeated them:

  • Forget the lock code
  • Forgot password email
  • Application error
  • Often hangs
  • HardBrick

 The following equipment before the update Hitech Amaze Tab 3 :

  1. SP Flashtool Version 5 from here
  2. Mtk tool and root droid from here
  3. MT65xx usb driver from here
  4. MT6577 driver usb vcom from here
  5. Stock Rom Hitech Amaze Tab 3 here

Tutorial Upgrade:

  1. Download and extract the SP Flash Tool and Mediatek USB VCOM drivers
  2. Install the driver if not already installed
  3. Download and extract your ROM package and find the scatter.txt file.
  4. Run Flash_tool.exe then click Scatter-loading button to load the correct scatter file
  5. Turn off your phone, remove the battery and replace it after some seconds (and don't turn on the phone).
  6.  Press F9 (or hit Download button) and connect your phone into the computer via USB data cable. The process will start and a red progress bar will appear.
  7. After the red progress bar is complete, there will appear a purple progress bar.
  8. Right after the purple progress bar is complete, a message will appear underneath it:
    “Please insert USB cable in x seconds” and then the download will start right away (you will see the yellow progress bar filling up).
  9. When the yellow bar is complete, you'll get a popup with a green circle and Download OK message, which means that the process has been successfully terminated.
  10. You can now safely disconnect your phone and turn it on. The process ends here.


Complate Hitech Amaze Tab 3 Tutorial : How to Flashing Android Via SP Flashtool

Read More
Unknown

How To Flash Update hitech Air A6 Via SPFT


Tutorial Flashing Stock Rom hitech Air A6 using SP Flashtool cause damage to software, application error, the touch screen does not work, the initial loading is not completed or bootloop and errors due to root damage and various kinds of softwareIt can be fixed by updating the firmware or flash reset, the total space is full. Ram's performance resulted in slowing down and making Android damaged software or in many cases the initial loading can not get into the main menu. but do not worry there are plenty of cases of damage to software that can be resolved by Flashing repeated them:

  • Forget the lock code
  • Forgot password email
  • Application error
  • Often hangs
  • HardBrick

 The following equipment before the update :

  1. SP Flashtool Version 5 from here
  2. Mtk tool and root droid from here
  3. MT65xx usb driver from here
  4. MT6577 driver usb vcom from here
  5. Stock Rom hitech Air A6 here

Tutorial Upgrade:

  1. Download and extract the SP Flash Tool and Mediatek USB VCOM drivers
  2. Install the driver if not already installed
  3. Download and extract your ROM package and find the scatter.txt file.
  4. Run Flash_tool.exe then click Scatter-loading button to load the correct scatter file
  5. Turn off your phone, remove the battery and replace it after some seconds (and don't turn on the phone).
  6.  Press F9 (or hit Download button) and connect your phone into the computer via USB data cable. The process will start and a red progress bar will appear.
  7. After the red progress bar is complete, there will appear a purple progress bar.
  8. Right after the purple progress bar is complete, a message will appear underneath it:
    “Please insert USB cable in x seconds” and then the download will start right away (you will see the yellow progress bar filling up).
  9. When the yellow bar is complete, you'll get a popup with a green circle and Download OK message, which means that the process has been successfully terminated.
  10. You can now safely disconnect your phone and turn it on. The process ends here.


Complate hitech Air A6 Tutorial : How to Flashing Android Via SP Flashtool
Read More
Unknown

Tutorial Flash Update Sony Xperia M4 Aqua E2303


How To Flashing Update Firmware Sony Xperia M4 Aqua E2303 android Lolipop for download errors, application errors, the touchscreen is not sensitive, exposed to the virus internal memory, loading a boot loop, until the hardbrick could be detected in a firmware update for the computer drivers. Below you can find the latest firmware for phonesImmediately following his ways:


· How to Flash latest to Sony Xperia M4 Aqua E2303 Firmware


a) First of all, check your firmware version (if you already have the latest, you do not need this tutorial)

b) Download and install the latest Flashtool

c) Download the latest Firmware Xperia M4 Aqua E2303 Here all sony firmware here

d) Paste FTF file downloaded in step c) to the folder "Firmware" in the folder Flashtool

e) Open Flashtool, click on the flash and select the firmware was downloaded, click ok. Important - if you do not want to delete the data from your phone, simply uncheck userdata.sin. All data will remain in your phone, but sometimes it can cause additional problems. So it is better (and I recommend) to perform a backup of your personal data, continue with the installation clean and then restore your personal data.

f) Turn off your phone and when Flashtool show pop-up window, connect the phone to the PC by pressing the volume down key until the Led green color appears

g) After a few minutes all done and you get new firmware phone
Read More
Unknown

How To Flash Update Sony Xperia M5 E5603

Tutorial Flashing Update Firmware Sony Xperia M5 E5603 For download errors, application errors, the touchscreen is not sensitive, exposed to the virus internal memory, loading a boot loop, until the hardbrick could be detected in a firmware update for the computer drivers. Below you can find the latest firmware for phonesImmediately following his ways:


  • How to Flash latest to Sony Xperia M5 E5603 Firmware


a) First of all, check your firmware version (if you already have the latest, you do not need this tutorial)

b) Download and install the latest Flashtool

c) Download the latest Firmware Sony Xperia M5 E5603 Here all sony firmware here

d) Paste FTF file downloaded in step c) to the folder "Firmware" in the folder Flashtool

e) Open Flashtool, click on the flash and select the firmware was downloaded, click ok. Important - if you do not want to delete the data from your phone, simply uncheck userdata.sin. All data will remain in your phone, but sometimes it can cause additional problems. So it is better (and I recommend) to perform a backup of your personal data, continue with the installation clean and then restore your personal data.

f) Turn off your phone and when Flashtool show pop-up window, connect the phone to the PC by pressing the volume down key until the Led green color appears

g) After a few minutes all done and you get new firmware phone


This is Full Tutorial :  How To Flashing Sony Xperia Via Flashtool


Read More